2013年12月26日木曜日

ステップディテクタ「Sensor.TYPE_STEP_COUNTER」を使ってみる

歩数計"TYPE_STEP_COUNTER"に続き、"TYPE_STEP_DETECTOR"です。 こちらは歩数ではなく、Stepと判定したタイミングで通知を受けます。
http://developer.android.com/reference/android/hardware/Sensor.html#TYPE_STEP_DETECTOR


Initialize Sensor

SensorManagerを使い、Sensorオブジェクトを取得します。
public class StepCounterActivity extends Activity {
    private SensorManager mSensorManager;
    private Sensor mStepSensor;
    private TextView mTextView;

    @Override
    protected void onCreate(Bundle savedInstanceState) {
        super.onCreate(savedInstanceState);
        setContentView(R.layout.activity_main);

        mTextView = (TextView) findViewById(R.id.text_step);

        mSensorManager = (SensorManager) getSystemService(SENSOR_SERVICE);
        mStepSensor = mSensorManager.getDefaultSensor(Sensor.TYPE_STEP_DETECTOR);

    }

    protected void onResume() {
        super.onResume();
        mSensorManager.registerListener(mSensorEventListener, mStepSensor,
                SensorManager.SENSOR_DELAY_NORMAL);
    }

    protected void onPause() {
        super.onPause();
        mSensorManager.unregisterListener(mSensorEventListener);
    }


Create a SensorListener

トリガーはonSensorChangedのコールバックメソッドで取得します。
Stepが発生したタイムスタンプとevent.values[0]に1.0fが格納されています。

    private SensorEventListener mSensorEventListener = new SensorEventListener() {
        private int mStep;

        @Override
        public void onAccuracyChanged(Sensor sensor, int accuracy) {

        }

        @Override
        public void onSensorChanged(SensorEvent event) {
            if (event.values[0] == 1.0f) {
                mStep++;
            }
            mTextView.setText(Integer.toString(mStep));
        }
    };

2013年12月25日水曜日

歩数計「Sensor.TYPE_STEP_COUNTER」を使ってみる

API 19でSensorに歩数計"TYPE_STEP_COUNTER"が追加されました。

http://developer.android.com/reference/android/hardware/Sensor.html#TYPE_STEP_COUNTER


Initialize Sensor

SensorManagerを使い、Sensorオブジェクトを取得します。
public class StepCounterActivity extends Activity {
    private SensorManager mSensorManager;
    private Sensor mStepSensor;
    private TextView mTextView;

    @Override
    protected void onCreate(Bundle savedInstanceState) {
        super.onCreate(savedInstanceState);
        setContentView(R.layout.activity_main);

        mTextView = (TextView) findViewById(R.id.text_step);

        mSensorManager = (SensorManager) getSystemService(SENSOR_SERVICE);
        mStepSensor = mSensorManager.getDefaultSensor(Sensor.TYPE_STEP_COUNTER);

    }

    protected void onResume() {
        super.onResume();
        mSensorManager.registerListener(mSensorEventListener, mStepSensor,
                SensorManager.SENSOR_DELAY_NORMAL);
    }

    protected void onPause() {
        super.onPause();
        mSensorManager.unregisterListener(mSensorEventListener);
    }


Create a SensorListener

歩数はonSensorChangedのコールバックメソッドで取得します。
値はevent.values[0]に格納されています。
端末機起動後から計測した歩数の値を返します。0に戻るときは端末再起動時だけです。

    private SensorEventListener mSensorEventListener = new SensorEventListener() {
        private float mStepOffset;

        @Override
        public void onAccuracyChanged(Sensor sensor, int accuracy) {

        }

        @Override
        public void onSensorChanged(SensorEvent event) {
            if (mStepOffset == 0) {
                mStepOffset = event.values[0];
            }
            mTextView.setText(Float.toString(event.values[0] - mStepOffset));
        }
    };

2013年11月17日日曜日

何気なく使っているFramework PrintManager

Android 4.4 KitKatoから追加されたPrint機能。

※調査する時間が取れず、中途半端ですが一旦公開します。


確認しておいた方がいいソース

Print機能を構成するパッケージが4つに分かれています。
すべて重要なので、確認しておきましょう。

\frameworks\base\core\java\android\print
PrintManager.java
IPrintSpooler.aidl

\frameworks\base\core\java\android\printservice
PrintService.java
PrinterDiscoverySession.java
IPrintService.aidl

\frameworks\base\packages\PrintSpooler\src\com\android\printspooler
PrintSpoolerService.java

\frameworks\base\services\java\com\android\server\print
PrintManagerService.java
RemotePrintService.java
RemotePrintSpooler.java
UserState.java


簡易クラス図

2013年11月3日日曜日

Andoird 4.4 KitKat StatusBarの変更点(基本設計編)


システムよりの確認です。


SystemServerをみる

config.disable_systemuiの設定次第で、ステータスバーを非表示にできる。

https://android.googlesource.com/platform/frameworks/base/+/android-4.4_r1/services/java/com/android/server/SystemServer.java
 
        boolean disableSystemUI = SystemProperties.getBoolean("config.disable_systemui", false);

            if (!disableSystemUI) {
                try {
                    Slog.i(TAG, "Status Bar");
                    statusBar = new StatusBarManagerService(context, wm);
                    ServiceManager.addService(Context.STATUS_BAR_SERVICE, statusBar);
                } catch (Throwable e) {
                    reportWtf("starting StatusBarManagerService", e);
                }
            }


SystemUiをみる

そもそも、Tablet用のフォルダがなくなった。すでに、JBでは使われていなかった。(※Nexus系の端末)

https://android.googlesource.com/platform/frameworks/base/+/android-4.4_r1/packages/SystemUI/src/com/android/systemui/statusbar/

TV用は?

相変わらず、スケルトン。モジュールの定義のみ。

https://android.googlesource.com/platform/frameworks/base/+/android-4.4_r1/packages/SystemUI/src/com/android/systemui/statusbar/tv/TvStatusBar.java

2013年11月2日土曜日

4.4 KitKatの表示レイヤーについて


android-4.4_r1がAOSP上で公開されました。
毎度おなじみの表示レイヤーのチェックを行いました。

確認OSバージョン

android-4.4_r1 KitKat

表示レイヤー

OSのメジャーアップデートなので、表示レイヤーの変更点があるかどうか確認しました。
ソース
android-4.4_r1/policy/src/com/android/internal/policy/impl/PhoneWindowManager.java
(★ = 4.4_r1にて新規追加されたレイヤー)
レイヤー名用途
1TYPE_UNIVERSE_BACKGROUND
2TYPE_PRIVATE_PRESENTATION
2TYPE_WALLPAPER壁紙
3TYPE_PHONE着信などの電話用
4TYPE_SEARCH_BAR検索バー
5TYPE_RECENTS_OVERLAY履歴
5TYPE_SYSTEM_DIALOG電源OFFダイアログなどのシステムダイアログ
6TYPE_TOASTトースト表示
7TYPE_PRIORITY_PHONESIMエラー表示など
8TYPE_DREAMDream用レイヤー
9SYSTEM_ALERT_LAYERANRやLowバッテリー通知
10TYPE_INPUT_METHOD文字入力UI
11TYPE_INPUT_METHOD文字入力UIのダイアログ
12TYPE_KEYGUARD_SCRIM★keyguardが起動するまでの間、Keyguardの後ろに表示する
13TYPE_KEYGUARDキーガード表示
14TYPE_KEYGUARD_DIALOGシャットダウン中やSIMロック表示、キーガード表示中の電源OFFダイアログなど
15TYPE_STATUS_BAR_SUB_PANELPhone用expandしたパネル
16TYPE_STATUS_BARStatusBar
17TYPE_STATUS_BAR_PANELStatusBarをexpandしたパネル
18TYPE_VOLUME_OVERLAYボリューム変更
19TYPE_SYSTEM_OVERLAYキーガードより上位に表示するシステムオーバーレイ
20TYPE_NAVIGATION_BARナビゲーションBar
21TYPE_NAVIGATION_BAR_PANELナビゲーションBarの上に表示するために必要なパネル(searchなど)
22TYPE_SYSTEM_ERRORシステムエラー通知
23TYPE_MAGNIFICATION_OVERLAY拡大表示用
24TYPE_DISPLAY_OVERLAYSecondaryディスプレイ用
25TYPE_DRAGドラッグ&ドロップ操作用
26TYPE_SECURE_SYSTEM_OVERLAY
27TYPE_BOOT_PROGRESSBoot中のDialog表示
28TYPE_POINTERマウスポインター
29TYPE_HIDDEN_NAV_CONSUMERFakeWindow用


大きな変更点は
  1. TYPE_KEYGUARD_SCRIMの追加

アプリケーション開発者にはあまり関係ありませんが、Frameworksのカスタム作業がメインの方、WindowManagerServiceとKeyguard周りを調査しましょう。

2013年9月23日月曜日

IngressのComm風タブを作成してみた

IngressのComm風タブを作成してみました。


画面イメージ

デフェルトは画面下部にタブだけを表示し、タブを引っ張り上げることでViewを表示します。


引っ張り上げると、View内のコンテンツが表示されます。

ソース

以下、Githubにて公開中です。
ライセンスはMITライセンスです。
https://github.com/baroqueworksdev/MyApiDemo/blob/master/src/jp/baroqueworksdev/myapidemo/view/SlidePanelView.java

2013年8月1日木曜日

Android 4.3 で追加されたAppOpsの調査 その2

抑制できるパーミッション

以下のソースチェックしましょう。

frameworks/base/core/java/android/app/AppOpsManager.java

ソースを確認すると、次のような値が宣言されています。
これらの値を引数にして、モジュールをコールします。

 
public class AppOpsManager {
 :

    // when adding one of these:
    //  - increment _NUM_OP
    //  - add rows to sOpToSwitch, sOpNames, sOpPerms
    //  - add descriptive strings to Settings/res/values/arrays.xml
    public static final int OP_NONE = -1;
    public static final int OP_COARSE_LOCATION = 0;
    public static final int OP_FINE_LOCATION = 1;
    public static final int OP_GPS = 2;
    public static final int OP_VIBRATE = 3;
    public static final int OP_READ_CONTACTS = 4;
    public static final int OP_WRITE_CONTACTS = 5;
    public static final int OP_READ_CALL_LOG = 6;
    public static final int OP_WRITE_CALL_LOG = 7;
    public static final int OP_READ_CALENDAR = 8;
    public static final int OP_WRITE_CALENDAR = 9;
    public static final int OP_WIFI_SCAN = 10;
    public static final int OP_POST_NOTIFICATION = 11;
    public static final int OP_NEIGHBORING_CELLS = 12;
    public static final int OP_CALL_PHONE = 13;
    public static final int OP_READ_SMS = 14;
    public static final int OP_WRITE_SMS = 15;
    public static final int OP_RECEIVE_SMS = 16;
    public static final int OP_RECEIVE_EMERGECY_SMS = 17;
    public static final int OP_RECEIVE_MMS = 18;
    public static final int OP_RECEIVE_WAP_PUSH = 19;
    public static final int OP_SEND_SMS = 20;
    public static final int OP_READ_ICC_SMS = 21;
    public static final int OP_WRITE_ICC_SMS = 22;
    public static final int OP_WRITE_SETTINGS = 23;
    public static final int OP_SYSTEM_ALERT_WINDOW = 24;
    public static final int OP_ACCESS_NOTIFICATIONS = 25;
    public static final int OP_CAMERA = 26;
    public static final int OP_RECORD_AUDIO = 27;
    public static final int OP_PLAY_AUDIO = 28;
    public static final int OP_READ_CLIPBOARD = 29;
    public static final int OP_WRITE_CLIPBOARD = 30;
    /** @hide */
    public static final int _NUM_OP = 31;
 :
}


つまり、次のようなことしか抑制できません。
  • 位置情報
  • バイブレーション
  • 電話帳のR/W
  • 電話履歴のR/W
  • カレンダーのR/W
  • WiFiのスキャン
  • ノッティフィケーションのPost
  • 電話発信
  • SMSのR/W
  • SMS/メールの受信
  • SMSの送信
  • 設定のWrite
  • SystemAlertWindowの使用
  • ノッティフィケーションの参照
  • カメラ
  • オーディオの録音/鳴動
  • クリップボードのR/W

Internet、Bluetooth、SDカードなど、アプリケーションの再起動が必要そうな機能の抑制できないようです。
(※なぜアプリケーションの再起動が必要なのかは、frameworksのソースを確認しよう)


2013年7月27日土曜日

Android 4.3 で追加されたAppOpsの調査

Android4.3で追加されているAppOpsを確認しました。
アプリケーションのパーミッションの管理ができるかもしれません。


ポイント

AppOpsのポイントです。
  • AppOpsManager、AppOpsServiceが追加された
  • アプリケーションで使うには、getSystemService(Context.LAYOUT_INFLATER_SERVICE)をコール
  • アプリケーションのパーミッションの抑制ができる
  • framewokrs内の各サービスは、AppOpsServiceから設定値を取得して動作ON/OFFを決定
(AppOpsManager.MODE_ALLOWED / MODE_IGNOREDなどでgrepすればOK)


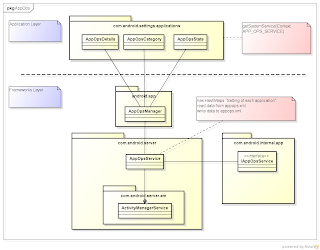
簡易クラス図


AppOpsServiceが生成されるタイミング

ActivityManagerServiceのコンストラクタで、AppOpsServiceが生成されます。

 
    private ActivityManagerService() {
        File systemDir = new File(dataDir, "system");
            :
        mAppOpsService = new AppOpsService(new File(systemDir, "appops.xml"));
            :
    }


AppOpsManagerの設定データ

AppOpsの設定値は次のように保存されています。
格納ディレクトリは上記のとおり、Systemディレクトリでファイル名はappops.xmlです。
設定値のR/Wは次のように、AppOpsServiceで処理されています。詳しく知りたい方はソースを確認しましょう。

 
public class AppOpsService extends IAppOpsService.Stub {
    public AppOpsService(File storagePath) {
        mFile = new AtomicFile(storagePath);
        mHandler = new Handler();
        readState();
    }

    void readState() {

    }
    void writeState() {

    }
}


ソース

android-4.3_r2.1のソースを確認すると、次のソースがAppOpsに該当します。
以下のソースは要チェックです。

Settingsアプリ
packages/apps/Settings/src/com/android/settings/applications
- AppOpsCategory.java
- AppOpsDetails.java
- AppOpsState.java
- AppOpsSummary.java


Frameworks
frameworks/base/core/java/android/app/ContextImpl.java
frameworks/base/core/java/android/app/AppOpsManager.java
frameworks/base/services/java/com/android/server/AppOpsService.java
frameworks/base/services/java/com/android/server/am/ActivityManagerService.java


『プロの力が身につく Androidプログラミングの教科書』が発売されました

執筆に参加

『プロの力が身につく Androidプログラミングの教科書』は6人のAndroiderによって、書かれています。
私も執筆に参加させていただきました。


こんな方へ

Androidをこれからはじめようとする方&脱初心者を望んでいる方に、是非、手に取っていただきたい本です。
本書HPから熱い思いをお伝えします。
引用元:http://android-textbook.com/android-programming-textbook/
※ここから引用
本書は、Android のことを「知る」「学ぶ」「考える」「使う」「守る」「試す」ための入門書になります。 Androidのことをより深く知ってもらうための書籍でもあり、Androidアプリケーションの開発をはじめたばかりの方でも、本書を順番に読み進めながら学べる学習スタイルを採用しています。初心者の方だけでなく、Androidアプリケーションを開発された経験がある方でも、Androidのことをより深く知ってもらうための要素を含んでいます。最終的にはオリジナルのアプリケーションを開発し、世の中に公開できるようになることを目標にしています。また本書は、Androidアプリケーションの開発方法のみならず、執筆者の経験から得たノウハウを詰め込んでいますので、すべての開発者が「Android」というものを深く知ることができます。
※ここまで引用

本書の目次が上記HPに公開されています。是非、ご覧ください。


プロの力が身につく Androidプログラミングの教科書
藤田 竜史 要 徳幸 住友 孝郎 日高 正博 小林 慎治 木村 尭海
ソフトバンククリエイティブ
売り上げランキング: 38,541

2013年7月16日火曜日

バッテリーの情報を取得する

アプリで端末のバッテリー情報を取得します。
以下のWebAPIを使用します。

Battery Status API
https://developer.mozilla.org/ja/docs/WebAPI/Battery_Status


取得可能な情報:
バッテリの残量(レベル)、
充電中かどうか
充電中完了までの時間
電池が空っぽになるまでの時間


アプリの表示部分

次のようにHTMLで表示します。

 
<body onload="onLoad()">
  <div id="charging">(charging state unknown)</div>
  <div id="chargingTime"></div>
  <div id="dischargingtime"></div>
  <div id="level"></div>
</body>


JavaScriptでWebAPIを使う

HTMLのbodyタグから、次のJavaScriptを実行させるようにしました。


// <body>のonloadにセット
/*
interface BatteryManager : EventTarget {
    readonly    attribute boolean             charging;
    readonly    attribute unrestricted double chargingTime;
    readonly    attribute unrestricted double dischargingTime;
    readonly    attribute double              level;
                attribute EventHandler        onchargingchange;
                attribute EventHandler        onchargingtimechange;
                attribute EventHandler        ondischargingtimechange;
                attribute EventHandler        onlevelchange;
};
*/
function onLoad(){
    var battery = navigator.battery;

    updateBatteryInfo();
    // add Listener
    battery.addEventListener("chargingchange", updateBatteryInfo, false);
    battery.addEventListener("chargingTime", updateBatteryInfo, false);
    battery.addEventListener("dischargingtimechange", updateBatteryInfo, false);
    battery.addEventListener("levelchange", updateBatteryInfo, false);

    // set text
    function updateBatteryInfo(){
        document.querySelector('#charging').textContent = battery.charging ? 'charging' : 'not charging';
        document.querySelector('#chargingTime').textContent = battery.chargingTime;
        document.querySelector('#dischargingtime').textContent = battery.dischargingTime;
        document.querySelector('#level').textContent = battery.level * 100 +"%";
    }
}


不要になったタイミングで、battery.removeEventListenerをコールし、リスナー解除を行いましょう。
FirefoxOs内の次のプログラムが非常に参考になります。

Gaia層(Settingアプリのソース)
 \gaia\apps\settings\js

2013年5月28日火曜日

GeeksPhoneでFireFoxOS端末 Keonを買ってみた

Peakにつづき、念願のKeonを購入しました。

http://www.geeksphone.com/


Keonの端末購入価格

Keonの価格は91ユーロ。
6台購入で546ユーロ、これに送料84.33ユーロを加算して、計630.33ユーロでした。
(※Peakより箱が大きいため、送料が高め)

クレジットの請求は、85,114円。(1ユーロ = 135.0円換算)
UPSの配達時に税金4,100円を支払。
合計:89,214円

Keon 1台あたり、14,869円


端末が届いた

UPSから届いた時の写真。

今回は箱で届きました。(※Peakは袋でした)


敷き詰められた、Keon。


UPSの記録

参考までに、UPSの配達記録を晒しておきます。
大阪市内に住んでいるため、UPS直轄地域で土日祝日には届けてくれません。

場所 日付 現地時間 状況
Osaka-shi, Japan 2013/05/27 14:27 配達済み
2013/05/27 13:20 仕向国センタースキャン
Osaka, Japan 2013/05/27 12:30 空港出発時刻
2013/05/27 9:05 空港上屋スキャン(輸入)
2013/05/27 7:48 空港到着時刻
Shenzhen, China 2013/05/27 3:16 空港出発時刻
Osaka, Japan 2013/05/26 16:18 通関業者により登録されました。貨物リリースは通関業者の確認が保留されています / 貨物は通関業者に提出されました。最終リリースを待っています
2013/05/26 16:18 通関業者により登録されました。貨物リリースは通関業者の確認が保留されています / 通関業者によってリリースされました。現在輸送中です
Shenzhen, China 2013/05/26 2:09 空港到着時刻
Mumbai, India 2013/05/25 18:33 空港出発時刻
2013/05/25 17:00 空港到着時刻
Koeln, Germany 2013/05/25 4:59 空港出発時刻
2013/05/25 0:49 空港到着時刻
Madrid, Spain 2013/05/24 22:36 空港出発時刻
2013/05/24 21:56 空港到着時刻
2013/05/24 21:40 空港出発時刻
2013/05/24 20:28 発地国センタースキャン
2013/05/24 17:40 集荷スキャン
Spain 2013/05/23 12:39 処理完了: UPSへの引渡し準備ができました

2013年5月10日金曜日

GeeksPhone Peakのgetpropの結果

adbでgetpropコマンドを実行。

adb shell getprop > geeksphone_peak_prop.txt


結果はこんな感じ。

[DEVICE_PROVISIONED]: [1]

[dalvik.vm.heapconcurrentstart]: [2097152]

[dalvik.vm.heapgrowthlimit]: [36m]

[dalvik.vm.heapidealfree]: [8388608]

[dalvik.vm.heapsize]: [128m]

[dalvik.vm.heapstartsize]: [5m]

[dalvik.vm.heaputilization]: [0.25]

[dalvik.vm.stack-trace-file]: [/data/anr/traces.txt]

[debug.camcorder.disablemeta]: [0]

[debug.camera.landscape]: [true]

[debug.composition.7x25A.type]: [dyn]

[debug.composition.7x27A.type]: [dyn]

[debug.composition.8x25.type]: [dyn]

[debug.composition.type]: [dyn]

[debug.enabletr.7x25A]: [false]

[debug.enabletr.7x27A]: [false]

[debug.enabletr.8625]: [false]

[debug.enabletr]: [false]

[debug.hwc.dynThreshold]: [1.91]

[debug.sf.hw]: [1]

[dhcp.wlan0.result]: [failed]

[gsm.version.ril-impl]: [Qualcomm RIL 1.0]

[httplive.enable.discontinuity]: [true]

[hwui.render_dirty_regions.7x25A]: [true]

[hwui.render_dirty_regions.7x27A]: [true]

[hwui.render_dirty_regions.8625]: [true]

[hwui.render_dirty_regions]: [false]

[init.svc.adbd]: [running]

[init.svc.akmd]: [running]

[init.svc.b2g]: [running]

[init.svc.comp-set]: [stopped]

[init.svc.console]: [running]

[init.svc.dbus]: [running]

[init.svc.debuggerd]: [running]

[init.svc.dhcpcd_wlan0]: [stopped]

[init.svc.dpi-set]: [stopped]

[init.svc.drm]: [running]

[init.svc.dsds_persist]: [stopped]

[init.svc.fakeperm]: [running]

[init.svc.installd]: [running]

[init.svc.keystore]: [running]

[init.svc.media]: [running]

[init.svc.netd]: [running]

[init.svc.netmgrd]: [running]

[init.svc.qcamerasvr]: [running]

[init.svc.qcom-c_core-sh]: [stopped]

[init.svc.qcom-c_main-sh]: [stopped]

[init.svc.qcom-post-boot]: [stopped]

[init.svc.qcom-sh]: [stopped]

[init.svc.qcom-usb-sh]: [stopped]

[init.svc.qcom-wifi]: [stopped]

[init.svc.qmuxd]: [running]

[init.svc.ril-daemon]: [running]

[init.svc.rilproxy]: [running]

[init.svc.rmt_storage]: [running]

[init.svc.servicemanager]: [running]

[init.svc.vold]: [running]

[init.svc.wpa_supplicant]: [running]

[keyguard.no_require_sim]: [true]

[lpa.decode]: [true]

[media.stagefright.enable-aac]: [true]

[media.stagefright.enable-fma2dp]: [true]

[media.stagefright.enable-http]: [true]

[media.stagefright.enable-meta]: [false]

[media.stagefright.enable-player]: [true]

[media.stagefright.enable-qcp]: [true]

[media.stagefright.enable-scan]: [true]

[net.bt.name]: [Android]

[net.change]: [net.tcp.buffersize.evdo_b]

[net.tcp.buffersize.default]: [4096,87380,110208,4096,16384,110208]

[net.tcp.buffersize.edge]: [4093,26280,35040,4096,16384,35040]

[net.tcp.buffersize.evdo_b]: [4094,87380,262144,4096,16384,262144]

[net.tcp.buffersize.gprs]: [4092,8760,11680,4096,8760,11680]

[net.tcp.buffersize.hsdpa]: [4094,87380,1220608,4096,16384,1220608]

[net.tcp.buffersize.hspa]: [4094,87380,1220608,4096,16384,1220608]

[net.tcp.buffersize.hsupa]: [4094,87380,1220608,4096,16384,1220608]

[net.tcp.buffersize.lte]: [4094,87380,1220608,4096,16384,1220608]

[net.tcp.buffersize.umts]: [4094,87380,110208,4096,16384,110208]

[net.tcp.buffersize.wifi]: [4096,221184,3461120,4096,221184,3461120]

[persist.cne.UseCne]: [none]

[persist.cne.bat.based.rat.mgt]: [false]

[persist.cne.bat.range.low.med]: [30]

[persist.cne.bat.range.med.high]: [60]

[persist.cne.bwbased.rat.sel]: [false]

[persist.cne.fmc.comm.time.out]: [130]

[persist.cne.fmc.init.time.out]: [30]

[persist.cne.fmc.mode]: [false]

[persist.cne.fmc.retry]: [false]

[persist.cne.loc.policy.op]: [/system/etc/OperatorPolicy.xml]

[persist.cne.loc.policy.user]: [/system/etc/UserPolicy.xml]

[persist.cne.rat.acq.retry.tout]: [0]

[persist.cne.rat.acq.time.out]: [30000]

[persist.cne.snsr.based.rat.mgt]: [false]

[persist.data.ds_fmc_app.mode]: [0]

[persist.dsds.enabled]: [true]

[persist.fuse_sdcard]: [false]

[persist.ims.regmanager.mode]: [0]

[persist.omh.enabled]: [1]

[persist.pwroffcharging.enable]: [1]

[persist.radio.adb_log_on]: [0]

[persist.radio.net_pref_0]: [0]

[persist.radio.nv_sms_utc]: [1]

[persist.radio.sma_voice_3gpp]: [0]

[persist.rild.nitz_long_ons_0]: []

[persist.rild.nitz_long_ons_1]: []

[persist.rild.nitz_long_ons_2]: []

[persist.rild.nitz_long_ons_3]: []

[persist.rild.nitz_plmn]: []

[persist.rild.nitz_short_ons_0]: []

[persist.rild.nitz_short_ons_1]: []

[persist.rild.nitz_short_ons_2]: []

[persist.rild.nitz_short_ons_3]: []

[persist.sys.strictmode.visual]: [false]

[persist.sys.timezone]: [Asia/Tokyo]

[persist.sys.usb.config]: [mass_storage,adb]

[persist.usb.serialno]: [full_twist]

[ril.ecclist]: [911,112,000,08,110,999,118,119,120]

[ril.subscription.types]: [NV,RUIM]

[rild.libargs]: [-d /dev/smd0]

[rild.libpath]: [/system/lib/libril-qc-1.so]

[ro.adb.qemud]: [1]

[ro.allow.mock.location]: [0]

[ro.baseband]: [msm]

[ro.bluetooth.remote.autoconnect]: [true]

[ro.bluetooth.request.master]: [true]

[ro.board.platform]: [msm7627a]

[ro.bootloader]: [unknown]

[ro.bootmode]: [unknown]

[ro.bootupmode]: [normal]

[ro.build.characteristics]: [default]

[ro.build.date.utc]: [1361496925]

[ro.build.date]: [vie feb 22 02:35:25 CET 2013]

[ro.build.description]: [full_twist-user 4.0.4.0.4.0.4 OPENMASTER eng.geeksphone.20130222.023345 test-keys]

[ro.build.display.id]: [OPENMASTER.eng.geeksphone.20130222.023345]

[ro.build.host]: [GP-HARLAN]

[ro.build.id]: [OPENMASTER]

[ro.build.product]: [twist]

[ro.build.tags]: [test-keys]

[ro.build.type]: [user]

[ro.build.user]: [geeksphone]

[ro.build.version.codename]: [AOSP]

[ro.build.version.incremental]: [eng.geeksphone.20130222.023345]

[ro.build.version.release]: [4.0.4.0.4.0.4]

[ro.build.version.sdk]: [15]

[ro.carrier]: [unknown]

[ro.com.android.dataroaming]: [true]

[ro.com.android.dateformat]: [MM-dd-yyyy]

[ro.config.alarm_alert]: [Alarm_Classic.ogg]

[ro.config.bt.amp]: [no]

[ro.config.bt.nvtool.enable]: [true]

[ro.config.ehrpd]: [true]

[ro.config.notification_sound]: [pixiedust.ogg]

[ro.config.ringtone]: [Ring_Synth_04.ogg]

[ro.crypto.fs_flags]: [0x00000006]

[ro.crypto.fs_mnt_point]: [/data]

[ro.crypto.fs_options]: [noauto_da_alloc]

[ro.crypto.fs_real_blkdev]: [/dev/block/mmcblk0p13]

[ro.crypto.fs_type]: [ext4]

[ro.crypto.state]: [unencrypted]

[ro.debuggable]: [1]

[ro.emmc.sdcard.partition]: [18]

[ro.emmc]: [1]

[ro.factorytest]: [0]

[ro.fm.analogpath.supported]: [false]

[ro.fm.mulinst.recording.support]: [false]

[ro.fm.transmitter]: [false]

[ro.hardware]: [qcom]

[ro.hw_plat]: [7x27a]

[ro.hw_platform]: [FFA]

[ro.max.fling_velocity]: [4000]

[ro.moz.fm.noAnalog]: [true]

[ro.moz.ril.emergency_by_default]: [true]

[ro.moz.ril.simstate_extra_field]: [true]

[ro.opengles.version]: [131072]

[ro.product.board]: [7x27]

[ro.product.brand]: [qcom]

[ro.product.cpu.abi2]: [armeabi]

[ro.product.cpu.abi]: [armeabi-v7a]

[ro.product.device]: [twist]

[ro.product.locale.language]: [en]

[ro.product.locale.region]: [US]

[ro.product.manufacturer]: [GEEKSPHONE]

[ro.product.model]: [GP-TWIST]

[ro.product.name]: [full_twist]

[ro.qualcomm.bluetooth.dun]: [true]

[ro.qualcomm.bluetooth.ftp]: [true]

[ro.qualcomm.bluetooth.hfp]: [true]

[ro.qualcomm.bluetooth.hsp]: [true]

[ro.qualcomm.bluetooth.map]: [true]

[ro.qualcomm.bluetooth.nap]: [true]

[ro.qualcomm.bluetooth.opp]: [true]

[ro.qualcomm.bluetooth.pbap]: [true]

[ro.qualcomm.bluetooth.sap]: [true]

[ro.qualcomm.cabl]: [1]

[ro.revision]: [0]

[ro.ril.gprsclass]: [10]

[ro.ril.hsxpa]: [1]

[ro.screen.layout]: [normal]

[ro.secure]: [0]

[ro.serialno]: [MSM8225SURF]

[ro.staticwallpaper.pixelformat]: [RGB_565]

[ro.use_data_netmgrd]: [true]

[ro.vendor.extension_library]: [/system/lib/libqc-opt.so]

[ro.wifi.channels]: []

[sys.acc.name]: [bma2x2]

[sys.boot_completed]: [1]

[sys.usb.config]: [mass_storage,adb]

[sys.usb.state]: [mass_storage,adb]

[system_init.startsurfaceflinger]: [0]

[vold.post_fs_data_done]: [1]

[wifi.interface]: [wlan0]

[wifi.wpa_supp_ready]: [1]

[wlan.driver.ath]: [1]

[wlan.driver.status]: [ok]

GeeksPhone PeakのUSBハードウェアID

WindowsPCからUSBで認識させる。
いつものやつを。

;Peak
%SingleAdbInterface%        = USB\VID_05C6&PID_8013&REV_0231&MI_00
%CompositeAdbInterface%     = USB\VID_05C6&PID_8013&MI_00

2013年5月9日木曜日

FireFoxOS(B2G)のPeak用ビルド

ソース取得

ソースの取得方法はこちら。
https://developer.mozilla.org/ja/docs/Mozilla/Boot_to_Gecko/Preparing_for_your_first_B2G_build

git cloneでベース環境を取得。
git clone git://github.com/mozilla-b2g/B2G.git
cd B2G

次のスクリプトを実行。

./config.sh peak

実行すると、、、
Get git://github.com/mozilla-b2g/b2g-manifest
remote: Counting objects: 620, done.
remote: Compressing objects: 100% (319/319), done.
remote: Total 620 (delta 402), reused 487 (delta 283)
Receiving objects: 100% (620/620), 126.73 KiB | 113 KiB/s, done.
Resolving deltas: 100% (402/402), done.
From git://github.com/mozilla-b2g/b2g-manifest
 * [new branch]      master     -> origin/master
 * [new branch]      v1-train   -> origin/v1-train
 * [new branch]      v1.0.0     -> origin/v1.0.0
 * [new branch]      v1.0.1     -> origin/v1.0.1
 * [new tag]         B2G_1_0_1_20130213094222 -> B2G_1_0_1_20130213094222
 * [new tag]         closing-nightly -> closing-nightly
fatal: manifest 'peak.xml' not available
fatal: manifest peak.xml not found
Repo sync failed

上記のエラーが出てしまいました。
peak.xmlがないとおっしゃっています。
config.shの中身をみると、以下のようにbranchが指定されています。
GITREPO=${GITREPO:-"git://github.com/mozilla-b2g/b2g-manifest"}
BRANCH=${BRANCH:-v1-train}
以下のgitとみると、確かにない。
https://github.com/mozilla-b2g/b2g-manifest/tree/v1-train


でも、masterブランチには存在しています。
https://github.com/mozilla-b2g/b2g-manifest


ブランチの切り替えは、以下のように公式ページに書かれています。
https://developer.mozilla.org/en-US/docs/Mozilla/Firefox_OS/Preparing_for_your_first_B2G_build
Building a branch
If you want to build for a branch other than the trunk, you will need to prefix your call to config.sh with a branch name, like this:
BRANCH=branch-name ./config.sh target


と、いうことで次のコマンドを実行。
BRANCH=master ./config.sh peak


ビルド実行

次のスクリプトを実行。

./build.sh


extract-files.shが実行され、端末からライブラリを引っこ抜こうとしています。
build.shの内容を確認すると、以下のような感じ。

    # Select which blob setup script to use, if any.  We currently
    # assume that $DEVICE maps to the filesystem location, which is true
    # for the devices we support now (oct 2012) that do not require blobs.
    # The emulator uses a $DEVICE of 'emulator' but its device/ directory
    # uses the 'goldfish' name.
    if [ -f device/*/$DEVICE/download-blobs.sh ] ; then
        important_files="device/*/$DEVICE/download-blobs.sh"
        script="cd device/*/$DEVICE && ./download-blobs.sh"
    elif [ -f device/*/$DEVICE/extract-files.sh ] ; then
        important_files="device/*/$DEVICE/extract-files.sh"
        script="cd device/*/$DEVICE && ./extract-files.sh"
    else
        important_files=
        script=
    fi

ビルド時間です。
VMware Player上ですが8スレッド認識、Corei7でSSDの環境です。

Creating filesystem with parameters:
    Size: 471859200
    Block size: 4096
    Blocks per group: 32768
    Inodes per group: 7200
    Inode size: 256
    Journal blocks: 1800
    Label: 
    Blocks: 115200
    Block groups: 4
    Reserved block group size: 31
Created filesystem with 776/28800 inodes and 26358/115200 blocks
Install system fs image: out/target/product/peak/system.img
out/target/product/peak/system.img+out/target/product/peak/obj/PACKAGING/recovery_patch_intermediates/recovery_from_boot.p total size is 102366980

real 29m22.116s
user 184m19.700s
sys 24m10.780s
Run |./flash.sh| to flash all partitions of your device

real 29m24.542s
user 184m23.600s
sys 24m11.160s

2013年5月8日水曜日

GeeksPhoneでFireFoxOS端末 Peakを買ってみた

GeeksPhoneでFireFoxOS端末を購入しました。
4/23に注文、5/7に届きました。

http://www.geeksphone.com/


Peakの端末購入価格

Peakの価格は149ユーロでした。
6台購入で894ユーロ、これに送料83.55ユーロを加算して、計977.55ユーロでした。

クレジットの請求は、129,924円。(1ユーロ = 132.9円換算)
UPSの配達時に税金5,700円を支払。
合計:135,624円

Peak 1台あたり、22,604円


端末が届いた

UPSから届いた時の写真。


UPSの袋はズタボロです。
中身が心配になりながら、袋を開けると、、、


こんな感じで、またもやUPSの袋。2重ですよ、2重。
で、もう一度、ふくろを開けると、、、


なんと、端末の箱がそのまま入っていました。
ええ、袋2枚に”だけ”覆われて、スペインから日本にまで送られてきました。


UPSの記録

参考までに、UPSの配達記録を晒しておきます。
大阪市内に住んでいるため、UPS直轄地域で土日祝日には届けてくれません。


場所 日付 現地時間 状況
Osaka-shi, Japan 2013/05/07 10:56 お客様は1回目の配達時にご不在でした。 2回目の配達が行われます。
2013/05/07 7:45 配達を手配しました
Osaka, Japan 2013/05/07 6:20 空港出発時刻
Osaka, Japan 2013/05/06 13:46 空港上屋スキャン(輸入)
2013/05/06 9:16 空港到着時刻
Narita, Japan 2013/05/06 7:52 空港出発時刻
2013/05/06 6:44 空港到着時刻
Shenzhen, China 2013/05/06 1:28 空港出発時刻
Osaka, Japan 2013/05/05 16:51 通関業者により登録されました。貨物リリースは通関業者の確認が保留されています / 貨物は通関業者に提出されました。最終リリースを待っています
2013/05/05 16:51 通関業者により登録されました。貨物リリースは通関業者の確認が保留されています / 通関業者によってリリースされました。現在輸送中です
Shenzhen, China 2013/05/04 0:19 空港到着時刻
Koeln, Germany 2013/05/03 6:24 空港出発時刻
2013/05/03 0:46 空港到着時刻
Madrid, Spain 2013/05/02 22:34 空港出発時刻
2013/05/02 22:03 空港到着時刻
2013/05/02 21:45 空港出発時刻
2013/05/02 20:09 発地国センタースキャン
2013/05/02 18:18 集荷スキャン
Spain 2013/05/02 13:32 処理完了: UPSへの引渡し準備ができました                                                                          

2013年4月7日日曜日

FireFoxOS(B2G)のビルド

FireFoxOS(B2G)をビルドしてみました。

ビルド環境構築

ビルド環境の構築方法はこちら。
https://developer.mozilla.org/ja/docs/Mozilla/Boot_to_Gecko/B2G_build_prerequisites

Androidのビルド環境がある方は、次のパッケージを追加すればいけるはず。(Ubuntu10.04で確認)

追加でインストールしたパッケージ
ccache autoconf2.13

ソース取得

ソースの取得方法はこちら。
https://developer.mozilla.org/ja/docs/Mozilla/Boot_to_Gecko/Preparing_for_your_first_B2G_build

git cloneでベース環境を取得。
git clone git://github.com/mozilla-b2g/B2G.git
cd B2G

Nexus Sのビルド環境は次のスクリプトを実行。config.shの中身をみれば、対応デバイスがわかります。

./config.sh nexus-s


ビルド実行

次のスクリプトを実行。
./build.sh


次のスクリプトでproprietary binariesの取得を行っています。
    # Select which blob setup script to use, if any.  We currently
    # assume that $DEVICE maps to the filesystem location, which is true
    # for the devices we support now (oct 2012) that do not require blobs.
    # The emulator uses a $DEVICE of 'emulator' but its device/ directory
    # uses the 'goldfish' name.
    if [ -f device/*/$DEVICE/download-blobs.sh ] ; then
        important_files="device/*/$DEVICE/download-blobs.sh"
        script="cd device/*/$DEVICE && ./download-blobs.sh"
    elif [ -f device/*/$DEVICE/extract-files.sh ] ; then
        important_files="device/*/$DEVICE/extract-files.sh"
        script="cd device/*/$DEVICE && ./extract-files.sh"
    else
        important_files=
        script=
    fi


ビルドが成功すると、こんな感じ。

Creating filesystem with parameters:
    Size: 536870912
    Block size: 4096
    Blocks per group: 32768
    Inodes per group: 8192
    Inode size: 256
    Journal blocks: 2048
    Label: 
    Blocks: 131072
    Block groups: 4
    Reserved block group size: 31
Created filesystem with 873/32768 inodes and 24287/131072 blocks
Install system fs image: out/target/product/crespo/system.img
out/target/product/crespo/system.img+out/target/product/crespo/obj/PACKAGING/recovery_patch_intermediates/recovery_from_boot.p total size is 93266198

real 19m22.266s
user 110m3.480s
sys 14m37.520s
Run |./flash.sh| to flash all partitions of your device

real 19m25.213s
user 110m7.650s
sys 14m37.910s


Corei7&VMware上(メモリ12GB)で、約20分でフルビルドができました。

2013年3月25日月曜日

Nexus 4でNFCタグが読み込めない?

Galaxy Nexusで正常に読み込めていたNFCタグが、Nexus 4で読み込めませんでした。
とりあえず、デバッグ。

ディスパッチシステムで配信されるNFCのデータを確認
 
Tag tag = intent.getParcelableExtra(NfcAdapter.EXTRA_TAG);
GNとN4のログを取ると、、、
 
Galaxy Nexus
TAG: Tech [android.nfc.tech.MifareClassic, android.nfc.tech.NfcA, android.nfc.tech.Ndef]

Nexus4
TAG: Tech [android.nfc.tech.NfcA]

ようするに、Nexus 4はMifareClassicは対応してないよ!ってことでした。

以下の2点を忘れていました。。。

  • MifareClassicとMifareUltralightはオプション
  • Nexus 4 /10のNFCチップはBroadcom製に変わった

以下のサイトも読んでおきましょう。


http://www.nfcbrief.com/2012/11/nexus-4-and-10-incompatible-with-mifare.html
http://developer.android.com/about/versions/jelly-bean.html

2013年2月4日月曜日

Google Playに誘導するNFCタグを作る


Google Playに誘導するNFCタグを作りました。
イベントなどで自作アプリを紹介する際、実際にダウンロードしてもらう良い手段だと思います。


Google PlayへのURL

Google PlayへのURLはこちらを参照。
Linking to Product Detail Page:
http://developer.android.com/distribute/googleplay/promote/linking.html


以下は詳細画面へのURLの例です。
From a web site:
http://play.google.com/store/apps/details?id=<package_name>
From an Android app:
market://details?id=<package_name>


Google Playアプリは「http:」でも反応します。Android端末以外のユーザーにも見てもらうために、「market:」ではなく「http:」を使用することをお薦めします。


NFCタグへの書き込み

Google Playアプリ詳細画面へのURLをNFCタグに書き込みます。
NDEF規格への書き込み例です。
手順
  1. NdefRecord#createUriでNDEFレコードを生成
  2. NDEFメッセージを生成
  3. Writeする

        NdefRecord rtdUriRecords[] = {
                // Google Playの詳細ページURL
                NdefRecord.createUri("http://play.google.com/store/apps/details?id=jp.baroqueworksdev.twiccamushroom")
        };
        NdefMessage ndefMsg = new NdefMessage(rtdUriRecords);
        Ndef ndef = Ndef.get(tag);

        if (ndef.isWritable()) {
            try {
                ndef.connect();
                ndef.writeNdefMessage(ndefMsg);
            } catch (IOException e) {
                e.printStackTrace();
            } catch (FormatException e) {
                e.printStackTrace();
            } finally {
                try {
                    ndef.close();
                } catch (IOException e) {
                    e.printStackTrace();
                }
            }
        }

2013年2月3日日曜日

NFCタグを読み込む NdefMessage編

NDEF規格のNFCタグを読み込む方法をまとめます。

参考:NFCタグにURLを書き込む
http://baroqueworksdevjp.blogspot.jp/2013/02/nfcurl.html


Intent-filterの記載

NDEF規格のNFCタグをハンドリングするために、android.nfc.action.NDEF_DISCOVEREDを追加
<intent-filter>
    <action android:name="android.nfc.action.NDEF_DISCOVERED" />
    <category android:name="android.intent.category.DEFAULT" />
    <data android:scheme="http" />
</intent-filter>


IntentからNDEF情報を取得する

IntentのExtra情報:NfcAdapter.EXTRA_NDEF_MESSAGESから、NdefRecordを取得する。
if (getIntent().getAction().equals(NfcAdapter.ACTION_NDEF_DISCOVERED)) {
    Parcelable[] rawMsgs = getIntent().getParcelableArrayExtra(
            NfcAdapter.EXTRA_NDEF_MESSAGES);
    if (rawMsgs != null) {
        for (Parcelable pa : rawMsgs) {
            NdefMessage ndefMsg = (NdefMessage) pa;
            NdefRecord[] records = ndefMsg.getRecords();
            for (NdefRecord rec : records) {
                android.util.Log.e("", "NDEF toString = " + rec.toString());
                // Added in API level 16
                android.util.Log.e("", "NDEF toMimeType = " + rec.toMimeType());
                // Added in API level 16
                android.util.Log.e("", "NDEF toUri = " + rec.toUri());
            }
        }
    }
}

NdefRecord#toMimeType()とNdefRecord#toUri()はAPI Level 16から使用可能。
それ以前のAndroid versionの場合、自分で生成しないといけません。
以下のソースが参考になるかも。
\frameworks\base\core\java\android\nfc\NdefRecord.java


注意点

こんなバグがあるから気を付けよう。
Issue 36968: Scanning an NFC tag without a ndef record results in null pointer exception
http://code.google.com/p/android/issues/detail?id=36968

2013年2月2日土曜日

NFCタグにURLを書き込む

NFCタグシールを購入しました。
価格は一枚あたり約300円でした


このNFCタグへURLの書き込みを行いました。

NdefFormatableのハンドリング

NdefFormatableのTag配信をハンドリングするための準備
AndroidManifest.xmlの記載
NFCを使うためのPermision
<uses-permission android:name="android.permission.NFC" />

<uses-feature
    android:name="android.hardware.nfc"
    android:required="true" />


Intent-filterの追加
<intent-filter>
    <action android:name="android.nfc.action.TECH_DISCOVERED" />

    <category android:name="android.intent.category.DEFAULT" />
</intent-filter>

<meta-data
    android:name="android.nfc.action.TECH_DISCOVERED"
    android:resource="@xml/nfc_tech_list" />


Tech-ListのXmlを作成
<resources xmlns:xliff="urn:oasis:names:tc:xliff:document:1.2">
    <tech-list>
        <tech>android.nfc.tech.NdefFormatable</tech>
    </tech-list>
</resources>


Activity側でTagを受信
IntentからTag情報を取得
if (getIntent().getAction().equals(NfcAdapter.ACTION_TECH_DISCOVERED)) {
    Tag tag = getIntent().getParcelableExtra(NfcAdapter.EXTRA_TAG);
}


NFCタグへURLを書き込む
NdefFormatable.get(tag)でNdefFormatableクラスを取得し、write処理を行う。
    public void write(Tag tag, String uri) {
        NdefRecord rtdUriRecords[] = {
                NdefRecord.createUri(uri)
        };
        NdefFormatable ndef = NdefFormatable.get(tag);
        NdefMessage message = new NdefMessage(rtdUriRecords);
        try {
            ndef.connect();
            ndef.format(message);
        } catch (IOException e) {
            e.printStackTrace();
        } catch (FormatException e) {
            e.printStackTrace();
        } finally {
            try {
                ndef.close();
            } catch (IOException e) {
                e.printStackTrace();
            }
        }
    }